Category Archives: Uncategorized

DIY: TTL metered prism for Pentacon Six – Part 2

TTL metered prism calibration

The Pentacon Six TTL metered prism measures the amount of light entering through the lens using a CdS photoresistor. First I’m going to talk a little bit about how it works. If you don’t want to know how it works, or getting more confused as you read on, you can still get the job done by just skipping the next three paragraphs and jump to the one after those.

Cadmium sulfide, or CdS, is a semiconductor that is often used for making light detectors. They are called photoresistor because of its variable resistive property to light: the resistance decreases as more light (more photons) hitting its surface. The reading is realized by a galvanometer – an ammeter that measures current. If you understand Kirchhoff’s circuit laws, having only one resistor (even though it’s a variable one) in a circuit loop is not enough to establish a current measurement because no electrons are branched off throughout the entire circuit. We need at least a simple current divider circuit to achieve that.

IMG_4347_1

In our TTL meter prism, we have a set of two adjustable resistors which are serial to each other, but parallel to the photoresistor. They are labelled 3 and 4 in the picture above. R3 has a large resistance for quick ball-park adjustments while R4 has a small resistance for fine tuning. This set of resistors is often called a “shunt” in our electronics  jargon. The problem is that the current measurement (Io) is not exactly linear vs. the resistance of the photoresistor (Rx), as shown in our current divider formula:
Io = I_input * Rx/(Rx + R3 + R4)
We can see that linearity occurs only when R3 + R4 ≈ C – Rx, where C is a constant larger than Rx. Practically, it means that the shunt needs to be readjusted accordingly if the photoresistance is very high (dark) or low (bright), in order to maintain (approximate) linearity. The purpose of having an adjustable shunt is exactly for this: to facilitate measurement in very low or high-light situations. Unfortunately, if you screw up the linearity by turning these resistors carelessly as I did, you’ll have a hard time readjusting it.

The next comes to offset adjustments. Offset adjustments are sometimes necessary to compensate variations such as temperature and aging of the coil inside the galvanometer. This is realized by the use of adjustable resistors serial to the photoresistor. They are R1 (large) and R2 (small). The offset is not exactly linear either as we now have this:
Io = I_input * (Rx + R1 +R2)/(Rx +R1 + R2 + R3 + R4)
It’s OK as long as R1 and R2 are relatively small.

In order to calibrate your prism, first you need a reliable reference – a good light meter, a digital camera, or even a sunny day using the Sunny f16 Rule. You’ll need a gray card as target as well. If you don’t have one handy, asphalt concrete or healthy green grass are good approximation. This is how I did:

  1. Peel off the leatherette on the top of the prism as pictured above.
  2. On a sunny day, use a reliable meter (I use my Canon 40D )to target the gray card at f5.6, ISO125 and Av mode, and get the shutter speed reading. It should give you around 1/1000s shutter speed using Sunny f16 Rule.
  3. Then use your Pentacon Six with the TTL metered prism and your favourite lens (I use my 80mm f2.8 Biometar) and follow the same setting – set the lens to f5.6 and set the prism meter dial to ASA125. Turn the power of the prism on. Press and hold the stop-down lever of the lens. Adjust the shutter speed ring of the meter dial until the needle points to the centre of the scale. Check if the recommended shutter speed aligns with the reading from the reference. If not, adjust knob 1 or 2 pictured above using a small screwdriver. Attention: Make sure the screwdriver is not touching any knobs when you take a reading, as the conductance of the screwdriver intervenes with the meter.
  4. Then repeat Steps 2 and 3, but this time with f16 (if your lens can go to f22, go for it). You should get something around 1/125s (or 1/60s for f22) this time. If the TTL meter is linear, it should align with your reference this time around and no adjustment is needed. If so, congratulations and you’re done with the calibration. If not, read on –  we have to play around with knobs 3 and 4 as well as 1 and 2.
  5. First check how much knob 3 can trun. Mine can turn about 240°, which is from 12 o’clock to 8 o’clock.
  6. Turn knob 3 all the way counterclockwise. Reapt Steps 3 and 4. If the reading does not closely align to the reference at the end of Step 4, turn knob 3 by 30° clockwise and do again. Repeat until you get something close to the reference in Step 4. My “sweetspot” for daylight use is happened to be in the middle, which is 4 o’clock position. Yours can be different.
  7. Use knob 4 for fine-tuning if necessary, again by repeating Steps 5 and 6 – where states turning knob 3, turn knob 4 instead.

2 Comments

Filed under Uncategorized

DIY: TTL metered prism for Pentacon Six – Part 1

I have two TTL meter prisms for Pentacon Six. They are nicely built and generally accurate – with the body, it looks simply much nicer than the waist-level finder or the non-metered prism. However, one of my prism has its eyepiece shutter lever stuck at “closed” position. I decide to take it apart…

IMG_4322

First, take off the top screw of the meter dial using a tweezer or two mirco screwdrivers. Beware not to scratch the screw.

IMG_4323

Then, take off the ASA/DIN plate, and the small washer beneath it. Optional: the eyepiece can be taken off by unscrewing the two tiny screws located at the underside of the eyepiece oriented in V-shape. You can see that the eyepiece shutter (the piece of plastic with diagonal white/blue strips) is at “closed” position. If you have a stuck shutter like I do, fiddle around with it and see if it fixes the problem.

IMG_4324

Using a tweezer, take off the big washer.

Note that there’s a little hook on the washer that keeps the ASA/DIN plate rotating in unison with shutter speed ring, unless you disengage it by pulling the ring up – that’s exactly what you do when you change the ASA/ISO/DIN setting!

IMG_4327

Next take off the shutter speed ring by unscrewing the three concentric screws. Afterwards, you should see a big dial as pictured above. Rotate it such that two screws at 3 and 9 o’clock positions are exposed. Unscrew them.

IMG_4329

Take off the aperture / stop-down metering selection ring, and the cardboard-made washer underneath as well.

There are two film-like washers underneath the big dial that tend to wobble (but shouldn’t come off easily).  Keep them in mind when you put everything back together – I fix their positions by putting needles through the screw mounts.

IMG_4332

Next, take off the two shinny screws using a screwdriver. Using a tweezer, take off the little piece of leatherette on the eyepiece shutter dial.

IMG_4333

After the tiny leatherette is taken off, a screw is exposed at the centre of the dial. Unscrew it 🙂

IMG_4334

Take off the dial and the washer underneath.

IMG_4335

At the front of the prism there’s a big piece of leatherette featuring the VEB Pentacon logo. Genently peel it off from one of the lower corners. Expose and unscrew the screw located in the lower middle.

IMG_4336_1

Now you can open the case. It may not the end of the dissembly depending on what you want to do. Below are the most likely reasons that you have read this far to learn how to dissemble your lovely P6 TTL metered prism:

  1. The prism has no response even with fresh battery installed – this generally attributes to broken electrical wiring. You can rewire it easily as the electrical contacts are generously big. Use thicker and longer wires if you can.
  2. Dusty / dirty prism – in most cases, small amount of dust and dirt are not an issue with meter accuracy or viewing, and not worth the hassle and risk to pop open the case to begin with, let alone going forward and take off the pentaprism. In case you insist, here are the steps:
    • Take off the screws pointed by the blue arrows
    • The pentaprism should be able to come off by pulling it vertically upward
    • Beware not to break anything or scratch the black paint of the pentaprism, which may cause light leaks and result in inaccurate meter reading. The needle-viewfinder periscope (the clear piece of plastic glued onto the needle side of the prism) is particularly easy to break. When it breaks off from the prism, it tends of chip off some glass!!
    • When putting back the pentaprism into the case, there are a few parts that are a PITA hard to position well. Use double-sided tape to help you:
      • the CdS photoresistor and its two connecting wires
      • the gaskets around the prism base used for light-proofing
  3. Stuck eyepiece shutter. The opening and closing of the shutter are operated by a spring (a metallic strip) clamped each side by a slit in the shutter on one side and the dail on another. The original design makes it more likely to stuck close than open 😦
    Check if the spring is still inside the slit of the shutter. If so, untighten the screw pointed by the red arrow and pull the whole metal part (dial stopper) against the direction of the arrow by just a little bit. Re-tighten the screw. This way, the dial will spend more of its cycle in open shutter position in each rotation, and thus less likely to stuck close in the future.
    If the spring is dislocated (i.e. out of the shutter slit), you will most likely need to take off the whole pentaprism. Follow #2 above and then do the tweak in previous paragraph.

If your prism has inaccurate meter readings, you don’t need to dissemble it. I will show you how to calibrate the meter in Part 2.

How to glue the leatherette back?

If you peel it off gentally and not too frequently, its adhesiveness should be good enough to stick back to where it used to be without noticeable traces of “tampering”. If it doesn’t stick, you need to glue it back and rubber cement is a no-no. I have tried Weldbond and it worked well. Apply a thin layer of glue on both sides and wait for one minute before bonding. I heard people using Tacky Glue with good results but I haven’t tried – make sure though you’re using the pH-neutral variety because the original one is slightly acidic, which may be harmful to the leatherette in long run.

Good luck!

6 Comments

Filed under Uncategorized

先睹為快 – 【彩色照片之黎明: 阿爾貝·卡恩的地球影像資料館】

書名: The Dawn of the Color Photograph: Albert Kahn’s Archive of the Planet
作者: David Okuefuna
出版: 普林斯頓大學出版社 (Princeton University Press)

如果你像我一樣喜歡旅行,攝影和歷史的話,那麼你就不可不知道阿爾貝·卡恩 (Albert Kahn) 了。他是彩色旅行攝影的鼻祖。

卡恩是一名法國銀行家。有一次他從日本公幹回國後,他在對各國風土的好奇心的軀使下開始了一個抱負: 要搜集和記錄整個世界的人和物! 從1909年,他僱用的攝影師在五十多個國家中拍攝了上萬的彩色照片 (當中包括了第一次世界大戰的報導 – 他們也算得上是戰地記者)。 計劃直到三十年代初才因世界大蕭條而被迫終止。

其實在這本書尚未出版之前,我在巴黎龐畢度中心 (Centre George Pompidou) 內的書店遇見一本類似的法文書。我就被書內過百的彩色老照片深深吸引 – 尤其是攝於亞洲的照片: 莫談彩色的,世間僅存的黑白照早已成滄海一粟了。但對於一個背著背包走天涯的我,它可是很重,而且挺昂貴 (45歐元), 最後只能與它緣盡於書店。難禁念念不忘…

剛剛收到了普大英文版的,一覽之下排版和法國的 Editions du Chêne 非常相似: 也許是因為同一作者的緣故吧! 價格也比法文版的便宜得多。包含的照片也不少於法文版,真真不錯。由於我當時沒有時間細閱法文版的內文,因此我無法知道其中一本是否翻譯版 (另外,David Okuefuna 也在 BBC Books 編寫了同一主題的) 。我尚未看完這本書,文章讀後感暫時欠奉。但有一點值得一提的,就是百年老照片不一定是黑白的! 我相信當一部分讀者看到這些彩色照的時候,在固有意識被突然扭曲之下會頓覺新奇。

卡恩的攝影師是用盧米埃彩色照相底板 (Lumière autochrome) 來營造彩色的效果。底片是由一塊塊的大玻璃製成。相對於現在,當時當旅行攝影師確是一門苦差: 對於現代的 large format 而言也是,135幅 DSLR 者如 EOS 1Ds 就更加可以不提了!

如此世世傳頌的照片乃源自卡恩對大千世界之好奇,現代西方文明多源之此。一百年前,我國的祖先正在好奇著什麼? 滿足自己的好奇心,是趣味,還是厭煩? 常對萬物好奇者, 是主流, 還是只限於三歲以下孩童?

Leave a comment

Filed under Uncategorized

Ecuador and the Galapagos – a year later

It’s been a year since I’ve visited this beautiful country. Here is a list of things that I still miss, in no particular order:

  • Freshly-squeezed blueberry and soursop juices in the streets of Quito
  • 25c rides on Trolebus, Ecovia and Metrobus which takes you to places in Quito in no time – I wish we have something like this in Toronto!
  • CAD$1 = US$1.10 during my visit
  • The Inca relics at the national museum (read: gold…)
  • Chances to practice my novice-level Spanish

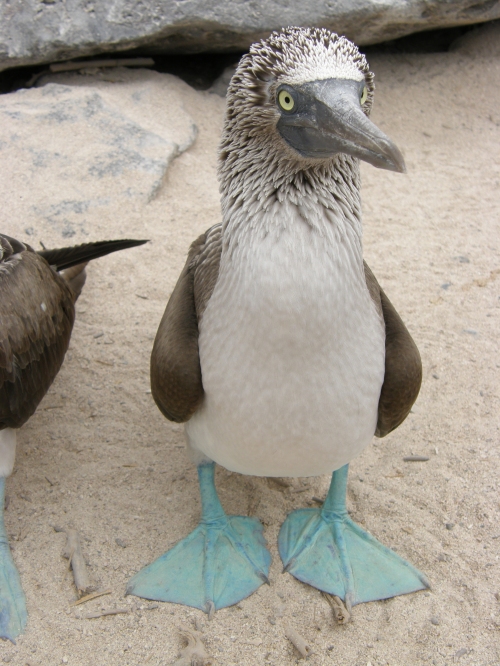
And most of all, the stunning wildlife in the Galapagos!

pc010395

If you are interested in visiting the islands, you have a good reason to make it into action in 2009. The coming year marks both the 150th anniversary of the publication of On the Origin of Species and the bicentenary of its author, Charles Darwin.  For those who don’t know already, the Galapagos Islands is the cradle of the Theory of Evolution.

As with everywhere else in the world, Ecuador has been in bad times since I left. It’s been particularly hard-hit because of its reliance in oil export (which by itself is an environmental and cultural catastrophe in the Amazon region). Some places to where I’ve been are now deemed unsafe to visit. From what I have observed, Ecuadorians are very friendly, hospitable and optimistic people.   I hope that all these churns are temporary. 2009 should be a year Ecuadorians take pride of : being a custodian of Darwin’s living laboratory.

Angelique

Leave a comment

Filed under Uncategorized

Preface

Here comes to the end of 2008.

I have been thinking of starting a blog for years. However, I couldn’t come up with anything inspiring to write, other than something like:

“I slept in this morning. I was so sleepy and I decided to skip all the morning classes. Oh well…”

I did have a lot of ideas in my head back then, but I didn’t have a chance to put them to realization because of a number of commitments.  Another reason of not writing and sharing something about my daily life was that no one would be interested in what I was doing, so I thought. I was wrong. It turned out that I have done something – in these few years at least – that some of my friends were interested in hearing about – so much for the lack of self-confidence!

In coming weeks, I’ll start off (loosely) with the accounts of my most recent travel. It’s just a way to share my experiences and to show my appreciation to my friends’ interest. If you know someone who would be interested in my writings, don’t hesitate to spread the word! A beauty about writing a blog is the ability to learn from others’ invaluable comments and responses – as old Chinese saying throwing out a brick to lure a jade. I will try to make them as interesting and personal as I can, I promise…

I’m going to stop short of introducing myself in this post. What is a better introduction than reading a person’s life, thoughts and reflections?

Enjoy!

Leave a comment

Filed under Uncategorized